
Making Buttons
Have you made your buttons, yet?When I make buttons, I do them in quantities of more than I need, because I use several jigs and many power tools so it's easier to do a bunch at once. That way, I can swiftly return my shop to it's intended purpose of sheltering my car.
As if I ever bother.
You can make buttons from just about any hard substance: wood, metal, bone, antler, old coins. A friend of mine actually took silicon caulk molds of half-a-dozen existing antler buttons and, using 2-part epoxy putty, makes buttons in vast quantities. This page is written assuming moose antler: it's flat, realtively easy to handle, and has a front and back that lets you get two buttons out of each cut. Hopefully, you have lots of power tools.
| ! Please Note: Many states have restrictions about the acquisition and transportation of any animal product, like antler or bone. Call your state's Department of Conservation and find out what the local laws are before you go after materials like this. |
Let's start with how big the buttons should be...I like 1" buttons. It's a good size, the lacings fit under without slipping or struggle to stay, and the proportions look right. You, of course, may do whatever size makes your smoke curl, but test it first.
There is one tool that you must have to make buttons. Welllll, you don't have to have it, but, damn, I wouldn't make buttons without it. The buttons I make are circular, and believe me I have no desire to try to cut a perfect cirle on my band saw. It's far easier to use a hole saw.
For those of you who don't know, a hole saw is a tube shaped blade that mounts on your drill, and it's typically used to cut holes in doors for doorknob assemblies.
"But, wait," you say, "what about the pilot bit in the middle? Doesn't it put a hole in the middle of your button?" And I reply, "It would if we left the pilot bit in..." You see, we're not going to use the thing as is...we're going to make some alterations.
|
Look for a hole saw where the hole cutting portion is interchangeable with other sizes.
Once you take the whole thing apart, you can replace the pilot bit with a section of threaded
rod. On one end, flatten the rod for the set screw, on the other, flatten it on three sides
for the drill chuck. Mount that in your drill (-press, hopefully) and you can cut perfect circles
without putting a hole through the middle of your button. As nice as it is, though, it's not going to cut perfectly smooth circles (especially after cutting about ten buttons), so you'll have to sand the edges of the buttons. Using a power sander will make the job much easier (I use a drum sander mounted in my drill press). Use medium grit, and hit the edges lightly. |
|
You can polish your buttons, or not. I like to, but it's an extra step. Use a buffing wheel mounted either on a stationary motor (ideal) or your drill press and white polishing compound.
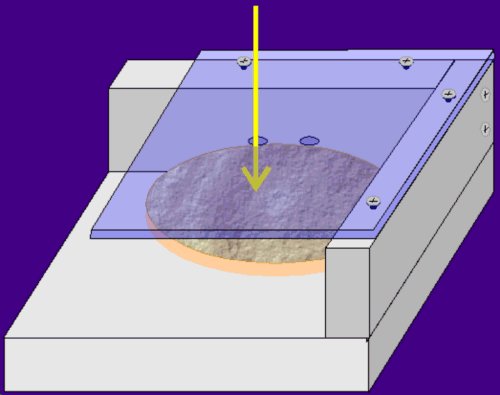
| Drilling the holes to attach the buttons is a little more work, and hopefully you'll have a jig to make the going easier. The first one I made was made from some 1-by-x scrap, with plexiglass for the hole guides, but the holes in the plastic got progressively bigger after being in contact with the drill bit so often. I've since made one with a 14 ga. aluminum top that has lasted quite a bit longer. |
|
|
Drilling the holes is a two step process. The first holes that you drill should be just big enough for the thread, about 1/8", if that. The second step is to bevel the edges of the holes. I use a 1/4" bit and press it into the button just enough to smooth the edges of the hole. |
