So I've got this "sloper"...
...now what do I do with it?Well...that's a good question. Most books that show how to draft don't show what to do afterward, and vice versa. So, starting with the sloper you learned how to make from The Costume Technician's Handbook (or any two darted sloper), here's what you do:
The details on this design are as follows:
- The front and back are each one piece(split one or the other for lacing) - seams may be introduced for decoration's sake, but they aren't necessary
- The lining is trigger (or even canvas) and carries the boning
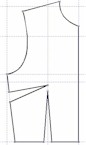 |
The pattern you start with should look something like this, with two darts to conform to the waist and bust. What we'll do over the next several steps is eliminate those darts and do all the shaping in the side seams. |
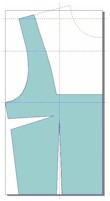
| I like to decide on the neckline in the next step. The shoulder strap should be about 1-1/4" wide,
down to halfway down the armhole before it starts curving in. The neckline should come to within 1-1/2
" of the nipple. No closer, and 2" is better - your subject will likely be pulling her breasts up
from being squashed. If she can't do that, not only will she have no cleavage but she'll be mighty
uncomfortable after while. As to the neckline, I show it as being drawn square...you can curve it if you like, so long as you can complete the next two steps while doing so. The important shape is the side front (see the next illustration) - use that as your guide. |
 |
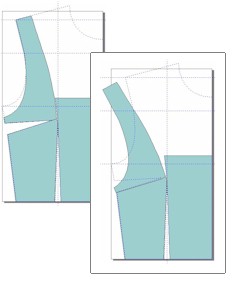 |
Before you do anything else, drop the bottom of the armhole at least 1-1/2" (2" is better).
If you don't, your subject won't be able to stand with her arms relaxed without being poked uncomfortably
(even painfully) in the armpit. Now we start eliminating darts. Draw a line from the tip of the waist dart to the neckline corner, or thereabouts. Cut the two pieces apart (I know...I said one piece...work with me...). Now close the bust dart and tape it shut. The paper will pucker some...let it. |
| Scoot the front piece under the side piece until the neckline corner and the waist dart bottoms meet. The amount of overlap at the bust point should be added to the side seam under the arm. This is going to have the rather unpleasant looking side effect of slanting the side seam a lot. Get used to it. There's nothing wrong it, even though modern designers avoid that sort of thing. | 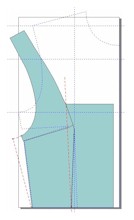 |
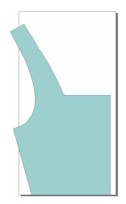 |
Your final pattern piece will look something like this. Note that I did not include anything below the waist...or the back for that matter. If you can get this far, then those two shouldn't be a problem for you: the mechanics are the same. |
