The Last Few Yards Are In Sight
Or: Now your life becomes all kinds of Hell......Not because the next steps are any harder than the steps you've done already, but because they are physically more difficult. There are more layers to be worked with than you have yet encountered (five layers at the botton block); the boot will be harder to manipulate, and the additional layers harder to sew through. The first time you do this will be the worst. It gets better, trust me.
|
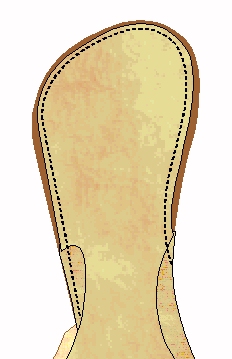
The first picture is a picture of the upper section of the boot, inside out, having been placed
against the sole and welt (see the last step on
the page just before this one). You want to sew the upper to the sole so that
when the boot is turned right-side-out (starting to get the picture?) only an eighth
-inch or so or the welt shows on the outside edge. If you used quarter-inch seam allowances
that means stitching through all layers down the center of the welt. What makes it tough is that you can't see it. It helps a lot if you're very accurate with the measuring of the width of the welt and it's placement on the insole. If you know exactly where they are, and glue the upper flush with the edge, then sewing it down isn't that big a problem. |
|
Now that all the pieces are sewn together and you've had a chance to relax, that last step in this phase is to turn the boots right-side out. Remember years ago when I mentioned 'breaking' the sole? If you didn't do that, the turning is going to go badly for you. This is not to say that it's going to go well if you did. Life just doesn't work that way.
I do this by turning the heel first (I guess I do that because it's easy). Then you have to push the toe up into the boot until the whole reverses itself and the thing lies vanquished on your workbench.
This is going to suck because it isn't going to want to do that. The leather is very stiff, even if you broke the sole. Persevere...it will eventually work.
There is one thing you can do to make your work go easier. I use an oak practise sword to push down against once the toe has been started. This makes life considerably easier. I use the point to get the thing started, then flip the sword and use the dull end to finish. Any length of wood will work so long as it is narrow enough to go inside the boot. Mounting it to the edge of your workbench will help a lot.
A final note: DO NOT push against the soft leather of the upper. Always push against the heavy leather of the sole. I'll never forget the day I drove an hour and a half to a stitchery in the next town to get this step done for me on a big machine with really heavy thread, only to put the point of my wooden practice sword through the toe.
