At last, the good stuff!
Jeez, I'm surprised you waited this long...If you've gone through the pages at least once, and have been doing each step as described in the order that the steps appear in these pages, Congratulations. You've done more than I did with my first pair. Of course, I didn't have these pages, or (truth be known) any idea what I was doing. Did that stop me? Hell, no!
|
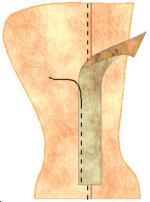
If you had to split the back to make the pieces fit, stitch it together now and apply
the foxing, as shown in figure 1 (cement first, then stitch it down). If you skive the
edge that underlaps, it'll be more comfortable against the back of your leg. Be careful
not to skive too much or you'll weaken the seam.
(You might also skive the bottom end of the foxing where it falls under the heel block, and the folded-under end of the first lacing block. The heel block will lay flatter if you do.) Notice that the foxing doesn't go all the way to the bottom. It stops about 3/4" to 1" from the sole edge of the boot. The back is going to be plenty thick enough without the foxing, and the heel block will cover the difference. |
|
|
The heel block will cover the bottom of the back foxing (if you're using one). With or without a foxing, the application is the same. Apply cement to the suede side of the block, the outside of the back, give it time to turn dull, put them together and stitch them down. Notice on the illustration that there is a bulge on the left side of the block created where the first lacing block (remember?) is folded under. Make sure you catch the underlap in the stitching. (There will also be a bulge created by the presence of the foxing. Don't sweat either of them.) |
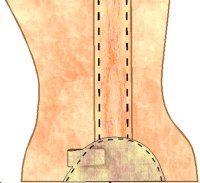
| If you're taking long stitches (i.e. sewing by hand), you might find it advantageous to sew a "box" over the underlap. Sewing by machine, the stitches are usually close enough together to make that unnecessary. Use your best judgement, and keep in mind that lacing blocks (particularly the lower ones) are going to under a lot of stress as you walk. |
|
