What to do, what to do...
Or Doesn't look much like a boot to me...First off, you'll probably find that the stretchy sock is starting to buckle the not-so-stretchy duct tape. Carefully peel the remains of the sock from the inside of the duct tape and liberally sprinkle talcum powder or cornstarch all over the sticky side of the duct tape.
If you gotten this far (and are working while you're reading) you may be holding the pieces of the duct tape boot in your hand thinking "I'm supposed to take this wrinkly thing and make a pattern from it?"
Uh...yeah. C'mon, I warned you about this. You're taking something three dimensional and rendering in two dimensions. I'll illustrate what you need to do by walking through the front piece.
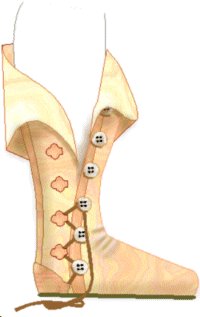
| The piece you're going to get will look like figure 1. Remember those marks we made all over the pattern? This is where they come in. Look at the area between labels A and B. See how wrinkled it is there? What you need to do is distribute the wrinkles evenly there and coax the pattern until it is flat. When you put the boot together, you will stretch this area to match the marks on the back piece (see, it all works out). Lay the pattern out on posterboard (nothing lighter) and trace around it, transferring the markings and making note of any areas that will need stretching (hint: any place where there are wrinkles perpendicular to the edge). You'll end up doing the same to the back, though it won't need as much babying it shouldn't be as wrinkly. | 
|
|
New info! Let's talk about stretching. The illustrations show the front section edges as curved, but your goal is to stretch those edges until they can be attached to the back without wrinkling or easing either piece. With chrome tanned leather, this is going to be tough: it doesn't like to stretch, and wet stretching doesn't work like it does with vegetable tanned leather. It can be done, however. Holding the leather down as tightly as I can, I pull the edges over the sharp edge of my work table. Just the edges: pull hard, "break" the leather over the edge.Be patient: you're going to have to do this dozens of times, and it may never stretch enough Do the best you can. Here's a hint, if you're mechanically inclined: two sets of vice grips with the jaws padding with leather scraps can help a lot.
|
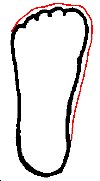 The sole is handled just a little differently. You can go ahead and throw away the bottom piece
of the duct tape bootie; you won't be needing it. You're going to modify the tracing you did of the
subject's foot, just a little. It's a simple modification:
The sole is handled just a little differently. You can go ahead and throw away the bottom piece
of the duct tape bootie; you won't be needing it. You're going to modify the tracing you did of the
subject's foot, just a little. It's a simple modification:
- Add 1/4" to the big toe, starting around the middle of the arch, tapering the line out to the little toe.
On to the next page: Pattern Adjustments
